
Collected from my experience, here is how to deal with slow parity virtual disk performance in Microsoft Storage Spaces. In most cases, recreation will be required, but in some cases, you might get away with not having to dump all your data elsewhere. This article presumes a Storage Spaces array with no SSDs and no cache. The problem being solved here is HDDs in SS parity volumes providing 20 to 40 MB/s writes instead of multiples of disk’s rated write speeds (100 to 300 MB/s).
Update 5/2022: This is by far the most popular article on this website. I have fixed up some typos, cleared up formatting and added some clarifications I get most commonly asked about. Also, the formula for calculating right AUS and interleave values and also the PowerShell command are now written in RED color, so you can find them on the page easier.
If you do a Google search for Storage Spaces parity performance, you will find both enthusiasts and professionals complaining about it. No wonder – the UI is very limited in what it shows to the user and sometimes doesn’t even work properly. Today, we will talk about Interleave sizes, Allocation Unit sizes and how they work together.
Columns
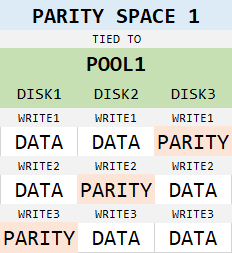
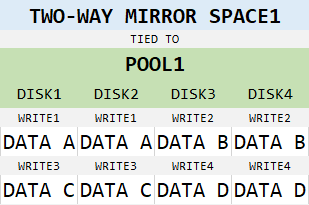
To understand all this, we have to know what columns are in Storage Spaces, since the user interface doesn’t communicate the NumberOfColumns parameter at all. SS gives users the opportunity to decide how many physical targets will be used for each write. This is more important than you might think. For parity spaces, this argument decides what is the storage efficiency going to be and affects performance as well. With 3 columns, we get 66% efficiency:
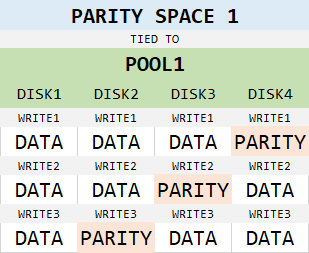
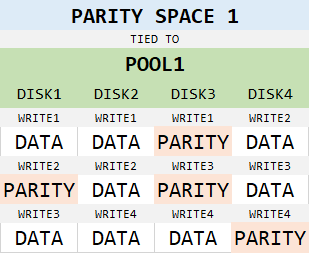
With 4 columns, we get 75% efficiency:
Here comes the kick:
Number of columns is not tied with number of physical disks in the pool.
Data and parity rotates between physical disks, so you can have 3-column parity virtual disk in a pool with more than 3 physical disks and data will be stacked evenly on all disks in the pool, with efficiency still being 66%, as shown below:
With parity spaces, the use of columns is quite clear. Same logic applies to other storage strategies as well, however. Consider this two-way mirror space, for example:
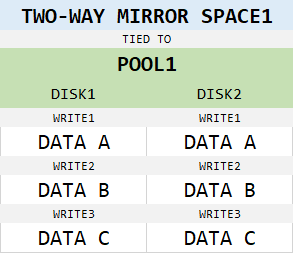
Simple, right? Everything gets written twice. What’s the big deal? Well, what if we increase amount of disks in the pool?
Well, what if we increase number of columns to 2?
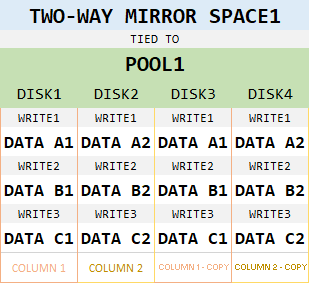
Now that we have done that, we have a mirror space with 4 physical drives, which splits data into two slabs and then creates copies of those two slabs. This brings awesome performance benefits, but decreases storage efficiency to 50%.
Interleave
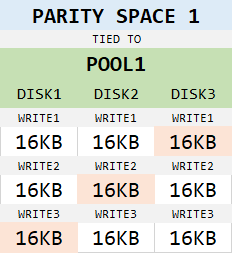
This parameter says how much data fits into single cell of a column. In a 3-column parity Space, an interleave size of 16KB means that our row is 48KB long, but 16KB must be reserved for parity, leaving 32KB for data. Hence, every write request will be split into an array of 32KB stripes, and each stripe split into two 16KB slabs. Those two 16KB slabs will be written to individual disks, with third 16KB slab being calculated on the fly as their parity and written to a third disk:
What we haven’t been considering all this time is volumes, partitions, allocation units and cluster sizes. Neither the pool, or the space have any care about what it is that they are actually writing into their disks. The volume provider has to take care of that, and above that volume is a partition. So the whole diagram gets even more complicated:
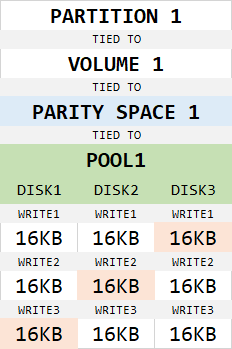
This is where performance gets hindered the most. Say that we have 4 disks in a pool, we want the data protected by parity, and we create a NTFS partition on this space, doing it all through Storage Spaces UI in Control Panel:
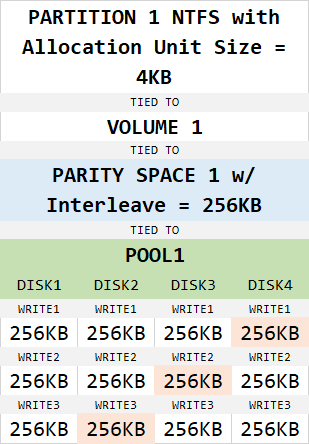
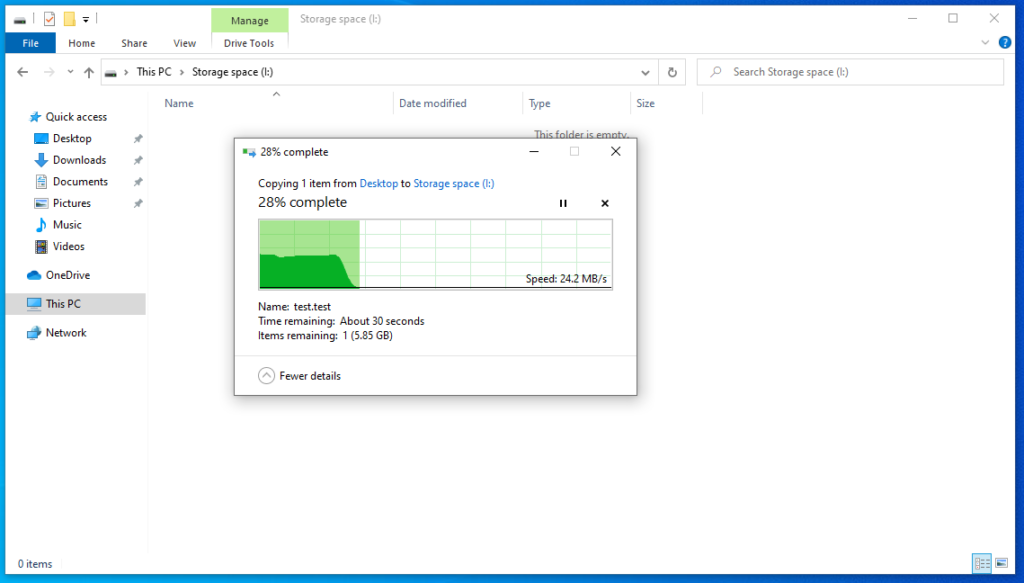
If your Virtual Disk is set to have maximum capacity below 16TB, Windows will create the partition with an Allocation Unit Size or AUS of 4KB. If it’s above 16TB, it will switch up to 8KB. This setting cannot be changed and you have to recreate the partition in order to set it differently. The performance loss here comes from the work that has to be done in order to align the data properly. Each write request has to first allocate the right number of units on the partition, which is 4KB each, and then all this has to translate into 256KB slabs which are propagated to the drives. This is expensive operation and causes the scenario that many Storage Spaces users know by heart – a 1 GB of blast speeds and then slowdown to unusable speeds:
The 1 GB rush is a Windows-default 1 GB write cache on system disk, if Storage Spaces considers it worthy. How do we fix this? We align the AUS and Interleave sizes. Since NTFS offers AUS of 4, 8, 16, 32 or 64KB, we have to set our Interleave size so that the following statement is true for our parity space:
$ntfs_aus = ($number_of_columns - 1) * $interleave
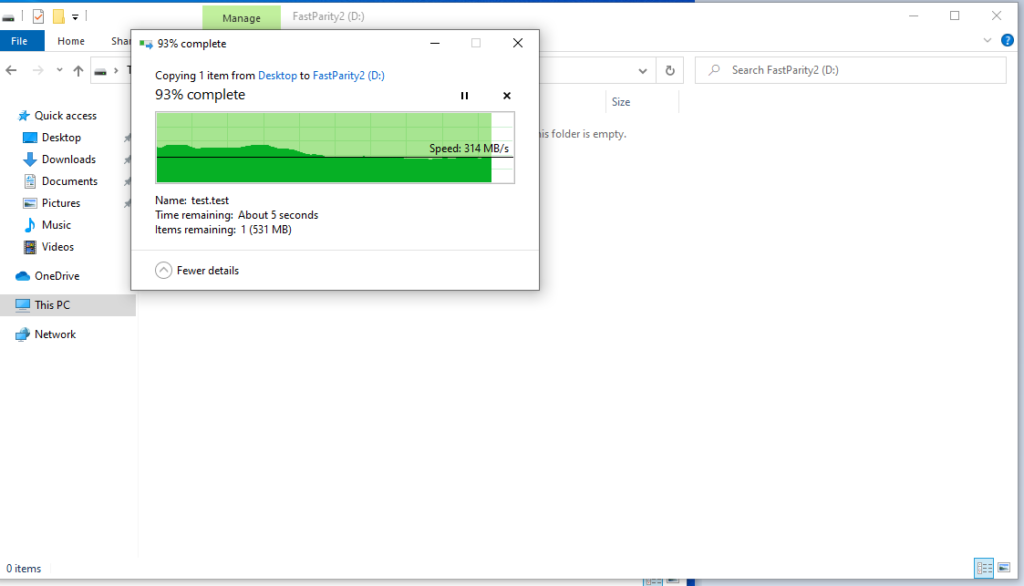
Let’s imagine this on a practical example. Say that we have a 3-column parity space of 3 disks, with an interleave of 32KB and a NTFS partition with AUS of 64KB. This means that our stripe size (row length over 3 columns) is 3x32KB, some 96KB. Of this, 1 column is parity, so only 64KB of the stripe are actual data. Now match that with NTFS AUS of 64KB. Perfect alignment. The secret sauce here is, that since Windows 10 build 1809, if you do that, Windows will completely bypass the cache and do full stripe writes, since it doesn’t have to recalculate the allocation. With this, the speeds are great:
In my experience, logical and physical cluster sizes don’t even come into play for mere mortals here, since all disks I was able to get my hands on are 512e. Windows knows this and will create the pool with both logical and physical sector sizes of 4KB. Google this if you want to know more, but I won’t be considering this topic in this article any further.
Incidentally, number of disks in pool has little, if any, performance impact on speeds of the virtual disk. You can have a 3 column parity space on 4 disks, which, if set as above, will perform great. With this in mind, you might have figured out already that there is no viable 4 column configuration for NTFS partition. There is no NTFS AUS that would be divisible by 3 and settable as interleave size for the virtual disk. Unfortunately, this configuration is exactly what Windows will do if given 4 disks in pool, as we have demonstrated above. To gain more parity performance, 5 disks and 5 columns are required. Then you can divide the NTFS AUS by 4 and that would be the interleave size for virtual disk on a pool with at least 5 disks.
As you can see, a lot of thought has to be given to the architecture of Storage Spaces before they are created, because once these values are set, it is hard or impossible to change them. For example, if you opted for permission-less exFAT partition, then you can’t change the partition’s size. That operation simply isn’t supported, so adding new disks into the pool will give no options. Additionally, if you opted for NTFS partition, you might be able to shrink it, create new virtual disk on the pool with correct values of NumberOfColumns and Interleave parameters and keep shrinking the original partition until all of the data is moved over. Of course the best course of action is to move the data off the pool completely, recreate the VirtualDisk and move the data back.
The last step here is to disclose to any potential readers how to actually do all this without the use of Control Panel, since the UI doesn’t give the user ability to change any of these parameters. It’s quite simple actually – but you will need to use PowerShell. Not to worry, all Windows 10 installations come with PowerShell preinstalled, so just run it from your Start menu. Microsoft, in all of it’s wisdom, has included 4 different ways of running PowerShell:
Just run the one highlighted above. The procedure is as follows:
1. Create a Pool
Create a Pool as you normally would. You can do this from Control Panel, same as before. If you have a pool already (from past Windows installations, for example), you might need to upgrade the pool. If this is the case, you can launch Storage Spaces from Control Panel and you will see the label “Upgrade pool” by the pool UI area.
2. PowerShell
Run PowerShell as Administrator. Right-click it in the Start menu and select Run as Administrator. When opened, you will need to run a command. In PowerShell, these are called cmdlets:
New-VirtualDisk -StoragePoolFriendlyName "YourPoolsName" -ProvisioningType Thin -Interleave 32KB -FriendlyName "FastParity" -Size 1TB -ResiliencySettingName Parity -NumberOfColumns 3
In this command, the following placeholders can/have to be replaced:
| Placeholder | Description | Example |
YourPoolsName | Name of the pool. This will not be shown anywhere in Explorer, it’s just a name of your pool that holds all of your drives. | POOL1 |
Interleave | Length of your stripe excluding the parity slab. Your future AUS must be wholly divisible by interleave value* | 32KB |
FastParity | Name of the virtual disk (not the partition). Again, this is not used in Explorer. | FastParity, or Disk1 |
Size | You can enter any size. Virtual disk can be smaller or larger than size of the Pool. Storage Spaces will let your create a 20TB virtual disk on a pool with combined size of 8TB. You can just add more drives to the pool once you start running out of space on the pool. You can also increase the size of the virtual disk in the future, but not shrink it. | 1TB |
NumberOfColumns | Number of columns including parity columns. This is all well explained above. You can’t set this number higher than the amount of physical drives in the pool, but you can set it lower, and in some cases you have to in order to avoid performance issues. | 3 |
*: Pay attention to this. Interleave value must be lower or equal to AUS value. Interleave value of 32KB and AUS value of 64KB is OK, because 64/32 = 2. However, Interleave value of 64KB and AUS value of 32KB is not OK, because 32/64 = 0.5 which is not a whole number.
Be sure to replace appropriate parameter values before hitting Enter.
Now that your virtual disk (or Space) is created, you can head right into Disk Management console of Windows, and you will find new, empty disk chilling in there:
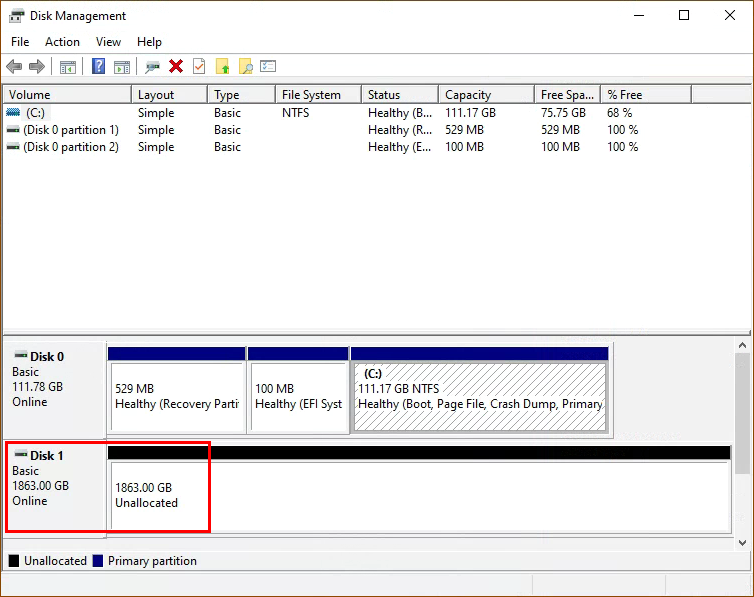
From here, it’s business as usual. Create new volume and partition as you normally would’ve, and do not forget to set the AUS correctly. Now you are able to enjoy full speeds.
Sources:
How would this work with 7x4TB disks with parity? I would need to set an interleave size of 24K which is not viable… thanks for any help
Then this become efficiency discussion. You can create 3 column parity space on a pool with 7 disks, but your efficiency would be 66% (2 disks worth of data, 1 disk worth of parity). That means on a 7x4TB disks with 28TB theoretical capacity, you would see around ~18.5TB usable space. However, if you bump this up to 5 columns, then your efficiency jumps to 80% (4 disks worth of data for every 1 disk worth of parity). This scheme, used on all of 7 disks in the pool would give you 5.6 disks worth of capacity, or 22.4TB.
Your allocation unit size on partition has to be divisible entirely by interleave size – so in your case a 256kB allocation unit size on partition would be fully divisible by 64kB interleave (column width). If you set your virtual disk as 5 column parity w/ Interleave of 64kB, you would align perfectly. The little downside to this would be that instead of having 6 columns for data and 1 column for parity (which would give you highest possible storage efficiency), you’ll have 4 columns for data and 1 column for parity, which on 7 disks will degrade storage efficiency as per above.
Logically, this means your options for aligned parity performance is to have 3 columns, 5 columns, 9 columns, etc. Without the parity column, the 2, 4 and 8 are numbers that allow you to set interleave column width to some portion of allocation unit size of partition that the AUS will be directly divisible by.
I am struggling with the calculation for a redundancy factor of 2. I have 7 drives but would prefer a 2-drive failure instead. Is the calculation different in this case? I have similarly reproduced your results with 5 drives in a parity setup with interleave 16KB and AUS 64KB (redundancy factor of 1) with great effect (thank you!!).
I put his formula into excel and was messing around with different values.
It took me a few minutes to figure it out but when he says
$ntfs_aus = ($number_of_columns – 1) * $interleave
I think he really means
$ntfs_aus is divisible by ($number_of_columns – 1) * $interleave
Please correct me if I am wrong.
(I’m pretty sure he mentioned this somewhere else, but I love formulas and it was throwing me for a loop!)
If I understand correctly the formula for dual parity would be
$ntfs_aus is divisible by ($number_of_columns – 2) * $interleave (Notice the – 2)
Suitable column numbers should include 4,6 and 10
With 7 drives that would give us a maximum of 7 columns and so the nearest valid column number would be 6.
64 is divisible by (6-2) * 16kb
64 is divisible by 4 * 16
64 is divisible by 64
Do note that the allocation size “16kb” doesn’t effect this equation.
Even if we went to 32kb it would still be valid.
128 is divisible by (6-2) * 32kb
128 is divisible by 4 * 32
128 is divisible by 128
Upon further review
$ntfs_aus = ($number_of_columns – 1) * $interleave
and
$ntfs_aus is divisible by ($number_of_columns – 2) * $interleave (Notice the – 2)
Effectively mean the same thing for this context.
If done currently they should always equal each other and be a factor of 2 up to 256kb which was the whole point lol.
Sorry for the confusion.
i know this sounds dumb but it would be nice to see how you did this in excel..
Very interesting thanks. I tried this using your settings and found an initial write speed burst of around a 1GB/s but then the write speed dropped dramatically and remained at or well below 1MB/s.
How would you determine the interleave and columns that are applied by default? Do you have a powershell command?
Further on this, out of interest, I recreated the storage space using the control panel. Then reformated the virtual drive to 512K (based on your info that the default interleave size is 256K) and that lead to sustained write speeds of 250-300MB/s.
Initially, when I tested the read speed I was getting just 10MB/s. But then on subsequent testing, getting the sustained read speed of around 300MB/s and that seemed consistent.
Perhaps I needed to give the initial settings a bit longer.
Reading through your comments, I don’t know your config. How many drives do you have? Are they all the same? How many columns did you go for and what was their interleave width? To provide at least some advice – the powershell commands are present in the article and the burst you see at the begining of copy/write seems to be the default cache that SS will create and use if partition AUS and Interleave are not aligned. If those would be aligned, the cache would’ve been bypassed entirely.
What would be the ideal settings for 4x2TB drives? I read through your article two times and still do not understand the right combination of interleave, AUS & columns for a given set of disks 🙂 Thanks
The article gives you formula you can use:
$ntfs_aus = ($number_of_columns - 1) * $interleave.The left-hand part of the formula can only have values you see in the menu when you’re formatting the drive. Windows will offer you 32 KiB, 64 KiB, etc. You have to make this work with what’s on the right-hand side of the equation. If your selected AUS is 256 KiB, then logically you can’t have 4 columns, because that would mean you have to come up with interleave size that is 256/3 which is 85 and one third of a kilobyte and you can’t set that as interleave. Your number of columns can’t be higher than the number of disks in your Space (array), so that pretty much tells you that with 4 disks, you will have to work with 3 columns. This means your effective storage will be 4x2TB times 66 percent, one third of your storage will be taken by parity. With 3 columns, you can figure out the equation on your own.
Thanks! Now I understand it. The only question I have is the interleave size. Since Windows Partition Creation wizard allows AUS up to 2048KB in a NTFS partion, in a 3-column setup I could go up to 1024KB per Interleave. Why 32KB?
I can’t think of a better reason other than this: The AUS sizes are usually determined based on the workload that the data space is expecting to carry. Large partition AUS will benefit storage of large files (like backups), because the allocation will be fast and indexing/defrag will be faster and easier. However, when used with small files, will lead to significant space waste (size vs. size on disk in properties dialog). Using smaller AUS will work better with smaller files but will be heavier on the amount of allocations required if used with larger files. It’s up to you to decide what will work best for you. With interleave size in SS, I can’t actually remember why should you be working with 32KiB and not smaller/larger amounts. This is the only resource I found that sorta makes sense. It’s just the typical IO transaction size I guess.
Very interesting and useful article. I experienced this problem at some point, where a 4-disks Storage Space could only read/write at a rate of 30MB/s and I decided to rebuild it. I tested its performance after applying the above recommended settings (I used ReFS instead of NTFS) and the Storage Space delivered ~200MB/s write performance. All looked good until I activated BitLocker encryption. Performance suddenly dropped back to 30MB/s and the computer’s performance degraded significantly, even though the CPU (i9 7900X) was mostly idle!!!
Why enabling Bitlocker affected the performance of the Storage Space so significantly is what I need to investigate next.
I strongly suggest reading up on my experience with Bitlocker on SS in the Data Disaster series. In second part, I go into detail how I lost some data using those in combination. Bitlocker is no joke and I wouldn’t recommend using it unless your storage setup is completely redundantly backed up to some other physical machine or two. Excerpt:
There’s also a lessons learned part at the end.
So, question here, I have four disks and might upgrade to five, each is 4TB. Assuming I get the fifth, what would be better? 5 Columns with AUS=128KB and a 32KB interleave, or go for 9 columns AUS=128KB and 16KB interleave? Or does it even make a difference? OR would there be something better all together?
I just realized, you said you can only do an AUS of up to 64 with NTFS, so that would ideally make 5 column, 5 disks, with an AUS of 64KB and an Interleave of 16 ideal, right?
Yes, correct 🙂 The secret sauce to bypass the cache and avoid the data aligning issue is to guarantee that block size of write in the Space will always match the allocation unit size on Partition. In your case, 5 disks with 5 columns in a single-parity scheme would work best in AUS of 64 KiB and interleave of 16KiB.
Note that it is also possible to use ReFS instead of NTFS (including ReFS with data integrity) and get very decent performance.
The only small caveat is that you want to make sure that you use 64KB for the ReFS UAS (because the default UAS for ReFS is 4KB, which would force you to use an interleave of 2KB or 1KB, and you sure don’t want to use an interleave value that’s smaller than the standard 4KB sector size of any modern HDD) and, of course, since Microsoft decided to remove the ability to format to ReFS in all recent regular versions of Windows 10 and Windows 11 (but thankfully not the ability to use and administer ReFS drives, once they have been created), you have to use a “Windows Pro for Workstations” edition to format the virtual drive (noting that you can always create a Windows To Go drive with that edition just to format the drive, if needed).
Below are the exact commands I used to create a 65.4TB ReFS Storage Space drive, using 5 x 18TB WD180EDGZ drives, and with an interleave of 64 KB / (5 – 1) = 16 KB:
New-VirtualDisk -StoragePoolFriendlyName “Storage pool” -ProvisioningType Fixed -PhysicalDiskRedundancy 1 -Interleave 16KB -FriendlyName “Data” -ResiliencySettingName Parity -NumberOfColumns 5 -UseMaximumSize
Then, after first creating an initial NTFS volume with 64KB UAS, to validate the performance, I reformatted the whole volume to ReFS, while also making sure that the UAS would be set to 64KB, with:
Format-Volume -DriveLetter D -FileSystem ReFS -AllocationUnitSize 65536
Using this, I found that I could seeing a sustained write speed of about 500 MB/s, even after turning ReFS Data Integrity on (See https://blog.habets.se/2017/08/ReFS-integrity-is-not-on-by-default.html), which is quite impressive. Of course, there’s a small drop in performance compared to using NTFS, where I saw the same virtual drive sustain a 600 MB/s write speed, but I am very pleased with the result.
So thank you for helping folks finally get a decent performance with Storage space and parity.
Just an update on my earlier post with the 65.4TB ReFS array. Unfortunately, even when you did everything right, it appears that Microsoft can still screw you up on a whim, because my fast parity array barely lasted a few weeks before Microsoft downgraded it to the dreadful write speeds everyone coming to this post is probably familiar with.
And the thing, I literally did not do anything! I just left the machine powered off for a couple of weeks, and when I powered it back on, I had the unpleasant surprise to find out that my beautiful 500MB/s write speed ReFS drive had now been downgraded to a paltry 30 MB/s… 🙁
The only change I can think off is that UEFI CSM was briefly enabled when Windows booted (this ASUS motherboard sometimes feel like enabling UEFI CSM on its own, and I have to force it back to disabled), but I can’t really see how that would have downgraded my write speed. Oh and of course, I checked that it wasn’t a HDD about to fail or cabling issue…
I also know that it is very important that Windows sees the physical drives in the exact same order as they had when the Storage Space pool was created, or else you will get degraded speeds, but Get-PhysicalDisk / Get-VirtualDisk confirm that, as far as Windows should be concerned, my configuration has not changed from how I created the array.
So, even when manually setting the interleave and everything, Microsoft WILL still screw you up with parity and Storage Spaces!
This is just so disappointing…
You’re correct ReFS has/has had known performance issues, but I’m not familiar with ReFS, so I can’t give help on this.
I have since switched to using ZFS with Debian Linux (and upgraded to an 8 x 18 TB raidz2 array while I was at it) because Storage Spaces is simply not worth it in terms of the amount of cajoling it takes to try to obtain a bare minimum level of performance… and keep it! But before I ditched my Storage Spaces array, I was able to find that the reason my performance was degraded was due to Microsoft issuing unwarranted continuous read I/O on two HDDs from the array during what should be a *pure* write operation. And of course, when you’re issuing simultaneous read + write I/O on HDDs, your performance completely tanks.
I have not been able to find out why on earth those read operations were being issued. Even with ReFS file integrity turned on, there’s absolutely no reason why writing brand new data should ever induce read operation, especially one that involves reading a very extensive amount of data as I found out.
Basically, it was as if, when writing a 4 TB file split over 5 HDDs (with parity), and instead of simply writing 1 TB of continuous data on each disk, the people who designed Storage Spaces thought it would be a “great idea” to read between 500 GB to 1 TB of random existing data (WHY?!?!?) at the same time… This makes absolutely ZERO sense when writing new data to a Storage Spaces array. And what’s even more unfathomable is that this behaviour did not occur when the array was first created and only started to manifest itself after a while…
So, rather than hope on Microsoft to provide an explanation for this utter bullshit of a storage software layer and/or finally fix it, so that people who want to use parity cease to be treated like second class citizens, I ditched Storage Spaces altogether in favour of ZFS, and would encourage anybody who is seriously thinking about storing large amount of data with an actual proper level of performance to do the same. As long as Microsoft can pull bullshit like this Storage Spaces is just not worth it…
So I found this page/thread after being already aware of this write cache parity bypass with the interleave magic match… In search of why ReFS was working then basically going back to normal (not bypassing write cache)… For me what I discovered is ReFS is initially fast just like ntfs but there is a catch is only on fresh formatted volume, you can fill the entire volume at full speed but as soon as you delete one file on the volume the speeds tank.
For some reason its like as soon as a delete happens something happens where new writes can’t bypass the write cache and I’m not sure why but am determined to figure it out.
For now I am between doing a mixed Mirror Accelerated Parity all on samespinning disks (has decent sustainedspeeds even when doing auto moves between tier on same disks) and does not suffer this issue as the writes first land on the mirror tier, but not as fast as parity while it is bypassing write cache.
For testing create a small volume like 300-400 GB then fresh format with refs and write about 300gb of new data all should be fast, then seekers a few files and try adding new data to see the write bypass no longer working, then just format and try again back to really fast again… So frustrating because I want refs over ntfs on the storage space for auto healing of corruption.
If anyone has any ideas please let me know
Hi,
Great article, thanks a lot.
I wonder if there is the possibility to change the interlave and columns on an already active storage space volume.
I have a running 64K partition on an storage space volume created from the console and would like to upgrade to 4 columns and 32Kb interlave…
I was there. You can only do that in case your current Storage Space occupies less than half of the total pool size. In that case, you can create another Storage Spaces configured the way you want and start dragging stuff over to it. When done, simply delete the old storage space and you’re done. It will take a lot of time because you’re copying data between two spaces that reside on the same pool of disks. If this is not an option for you, a less feasible, but doable way of doing this is to buy something like 18TB drive or drives, move data over to those, reformat your pool, move data back and return the drives for a full refund if your jurisdiction has that kind of laws in your favor. For this reason specifically I built myself secondary NAS so that I always have all the data on two different boxes in case I need to do some high-risk stuff like this.
Great! Thanks for the tips.
Just to be clear. I need to create a very flaxible StoragePool with a start of 5 disks that can increase until 10. I need 64KB cluster size in the partition due to the nature of files that will be stored in the SP, several GB each. Is it correct to create a SP having 16Kb interleave and 4 columns to balance storage utilization with performances?
Sorry, just checked that the perfect combination is 5 columns and 16KB interleave!
Just one question: what happened if I add disks to the SP and extend the partition? Will it retain all configuration and just extend everything and maintain performances so columns and interleaves?
Yes, you can absolutely do that. Also, I explain here: https://storagespaceswarstories.com/planning-ahead-for-drive-failure/
That article explains why you totally SHOULD do that and also keep enough drives and free space in the pool to sustain outright removal of a single drive unit.
Great article! It makes clearer understanding about relations of column, interleaves and AUSes. But I cannot achieve the best performance even with this understanding.
I have 10 physical disks and created new virtual drive with 10 columns, 16 KB interleave and double parity and create a volume on it with 128KB AUS (with powershell). Tests show 4000 Mbps of read performance and 1 Mpbs of write performance.
I created new double parity Vdisk with 6 columns, 16 KB interleave and 64KB AUS. Tests’ results are the same. Could you help me with that?
Are you by any chance using SMR disks? Also note that 1 mbps and 1 MB/s are vastly different speeds. The write performance will be affected fatally even if only one of the drives in the array is SMR. Otherwise your approach seems valid to me, the 16KiB interleave and 128KiB AUS make sense on a 10-column double parity Storage Space. If you’re using PMR or CMR disks, please post your exact powershell commands you used to create this setup, and also your HW (disks, CPU, RAM and also Windows build).
Thank you for the quick answer.
The disk model is ST4000NM017A (I didn’t find info if it is SMR). Those disks are in Dell MD 1400 Storage which is connected to a server Dell PowerEdge R340 via Dell 12 Gbps HBA. The number of disks is 10.
CPU Intel(R) Xeon(R) E-2224 CPU @ 3.40GHz
RAM 32 GB (2 Dimms x 16 GB DDR-4)
OS Windows Server 2019 Datacenter Version 10.0 (Build 17763) (x64).
I’m sorry for my interpretation of the write speed. I use diskspd (Microsoft utility for disk tests https://github.com/Microsoft/diskspd/wiki/Sample-command-lines): diskspd -c2G -w100 -b4K -F8 -r -o32 -W60 -d60 -Sh testfile.dat
and results are:
for single disk without storage space: 2,5 MiB/s
for 10 disks in double parity: 1,5 MiB/s
for simple storage space: 26 MiB/s
the command I use to create double parity:
New-VirtualDisk -FriendlyName “DDisk” -Interleave 16KB -NumberOfColumns 10 -ResiliencySettingName Parity -PhysicalDiskRedundancy 2 -UseMaximumSize -StoragePoolFriendlyName DPool |Initialize-Disk -PartitionStyle GPT -PassThru | New-Partition -DriveLetter “D” -UseMaximumSize | Format-Volume -FileSystem NTFS -NewFileSystemLabel “D” -AllocationUnitSize 64KB -Confirm:$false -UseLargeFRS
Hey thanks for the diskspd reference, I had no idea this existed. I can’t find anything wrong with your PS command used to create the SS vdisk. Also, I couldn’t find much info on the drives, same as you – it appears it’s some 4TB SAS medium with specific instant erase features, encryption and all that stuff. I’m sorry I can’t be of more help, I’ll try running this tool on my instance and see where I get – those numbers are quite weird — if I understood the syntax right, that should be random 4KB writes – on a medium with 64KB AUS, that’s my first concern. Second is that single disk space without SS of 2.5 MiB/s kind of spells doom for the workload this diskspd tool generates, it appears you’re trying to use your spinning rust as solid state storage under that load. For reference, can you try something more rednecky, like moving 10 GB file onto the vdisk to see what kind of speeds you’re looking at with this?
It’s strange that test shows unbelievable results. I tried robocopy 32GB file and it took 43 sec (700 MBps as I calculate).
So I understand that simply moving a file onto the medium works as expected, but the testtool that is blasting the volume with random 4KiB read requests is showing slower results? Wouldn’t that be kind of expected?
This is probably way too late, but I just found this site today. If my reading of your OP is correct, then this PowerShell command has the wrong AUS set. You need 128KB for a 10-column dual-parity with a 16KB Interleave ( (10-2)*16=128KB ), which is what you showed in your requirements. The PowerShell you say you used is setting the AUS to half that at 64KB.
Great article, albeit a bit over my head – but every now and then some knowledge drops on my head.
I am trying a new setup that has 5 x 4Tb CMR drives and dual parity with the intent to add a drive as needed until I hit 8 x 4Tb at which point I will probably go a different direction. But I see that quite a ways off in the future.
I see Diz says posts above with ” 5 disks with 5 columns in a single-parity scheme would work best in AUS of 64 KiB and interleave of 16KiB”
Not sure if this was single or dual parity, but would that hold true adding drives? Or have I messed something (likely).
Oh boy. I need more caffeine before posting in the morning. I now see Diz is a single parity.
Revising my question, would 5 disks with 5 columns in a dual-parity scheme would work best in AUS of 64 KiB and interleave of 16KiB in a system that will be systematically increased by adding one 4TB at a time until a max of 8 x 4TB drives is reached.
You would need at least 7 units for dual parity setup. The number of columns only dictates your minimum number of units and your storage efficiency, you can totally have 8 units in a 5 column setup. It only means that after writing the first data stripe across 5 units, the second data stripe will continue across the 3 remaining ones and continue over 2 more drive units from the original 5. This is visible in the visual aids across the article.
You can also keep adding disks to your pool and keep increasing size of your storage space. Storage Spaces do not care if you set maximum space size larger than that of the pool, but will warn you once you start creeping towards the pool size. I’ve recently put out article “planning for a drive failure”, you should read it to understand why certain amount of empty space in the pool is desirable.
I think your overall approach is correct. You’re using CMR drives, your AUS and data stripe sizes are all correct and you’re using 5 column setup with 8 drives instead of sticking with 3 columns.
Fudge. My PowerShell is weak. I cannot seem to get anything but default values to load without some link of error.
alright i have been struggling with this for several hours. I feel like I grasp your concepts and it makes since until I try to do this myself..
I have 8x8TB drives the only way i can get the AU divisible by the Interleave would be putting 5 Columns in there (i am horrible at math so i know i could be wrong) the problem is it seems that is what 21% efficiency? I am sure i am doing this wrong..
Why i am struggling i don’t know. Could i beg you for some help on this?
sorry i forgot to mention my settings
i was using AUS – 64K, 5 Columns, Interleave – 16K
Nah you’re fine. 8 units in 5 column setup and interleave of 16KiB gives you data stripe size of 64KiB. The 21% isn’t your efficiency, it’s your parity loss – your efficiency is 80%.
I am having no luck with this… Not sure why… Server 2022 – 5x18TB drives, 16KB Interleave, 5 columns, 64K AUS ReFS file system. I thought everything was going fine with some test transfers, then I start my copy from another array and performance craters. It also appears to be caching. Any ideas?
UPDATE: I do a test… good performance. Stop the copy. Do the test again, poor performance – clearly caching. Stop the test, wait for cache to settle, reformat partition, start another copy – good performance and perfmon shows cache bypass. I don’t get it…
UPDATE2: Well… I think I have figured what is going on. But I’m not sure why. If I BitLocker the volume, the cache doesn’t get bypassed, and performance tanks. If I re-format the volume and test with BitLockering the drive, performance is great. Any idea why? On this system, ordinarily BitLocker has a negligible effect on the performance of other (mirrored) volumes.
I’m not sure why Bitlocker would tank your performance, but I will caution you to use the Bitlocker encryption on a Storage Spaces volume. I describe in the Data Disaster series how that combo makes the data irrecoverably lost if anything happens to the volume.
I’m testing out different AUS values on an array of 4x4TB, Interleave 32K, 3 Columns.
64K AUS works great as expected, but so does 4K, 8K, 16K, and 32K. Why is this the case?
For my use case 4K AUS is best, storing several hundred thousand 32KB – 4MB files alongside thousands of 2GB – 50GB files. Lots of wasted space with 64K AUS.
Is it imperative to match AUS with the output of the equation? So far I can see no ill effects using 4K AUS with the above settings.
The AUS should be an integer multiple of your stripe size. If your stripe size is 64KiB (3 columns with 1 parity, 32KiB interleave) and your AUS is 32 KiB, then your AUS/STRIPE ratio is 0.5 so the condition isn’t met.
I’m thinking either Microsoft has implemented update that would somehow support your scenario, or something else is at play. Did you try to move sizeable content onto the medium? Like 50 GiB file so verify that the transfer speed doesn’t tank after 1 or 2 GiBs written? Also, the transfer speed should be 2 times your single disk write performance, so depending on your model, up to 400MiB/s.
Also be sure to check that your drives are not SMR, that would also sort of explain the drops you’re seeing.
I was able to push 2.21TB to it over gigabit ethernet in about 7 hours 31 minutes. Transferring large files locally gives me inconsistent results. A 50GB file copied at 400MiB/s to 450MiB/s only about 18GB of that went into modified memory and it flushed rather quickly.
Tried a 137GB file, got about 350MiB/s to 400MiB/s which dropped to about 200MiB/s to 250MiB/s halfway through. Modified memory stayed pretty consistent hovering around ~10GB.
Copied that same file again and got wildly different results. Fast at first then slowed to a crawl at 20MiB/s. So far this has been pretty confusing.
All my drives are HGST 4TB HUS724040AL (CMR)
So for now I have it set back to AUS of 64K and will just take the loss on storing small files. Also probably going to switch to using 5 drives, 5 columns, 1 parity to get better than 66% storage efficiency.
Thanks so much for putting this article together!
A lot of the examples here are of one parity drives, just for those curious this was my command to make a 7 drive pool with two parity drives (all 3TB drives): New-VirtualDisk -StoragePoolFriendlyName “RDA” -ProvisioningType Thin -Interleave 16KB -FriendlyName “Array” -ResiliencySettingName Parity -PhysicalDiskRedundancy 2 -NumberOfColumns 6 -Size 13.6TB
I could not figure out how to make it a maximum size, so I just took the number they said was the full amount (around 19TB) and multiplied it by .6, then went under a bit. I don’t have fast drives to transfer data from but all of the transfers have been happening at the source disk maximum speed, plus diskfilltest was operating around 450MB/s
I take that back, I calculated space by taking the individual drive size that was reported (2.73TB) and multiplying it by 5, then went a little under.
This post has changed my life! Why on earth don’t MS surface this kind of information. My dual parity storage space now gets around 300MB/sec!!
Hi Chris,
That’s terrific! Could you please share you setup and how you achieved it? Most of the examples here are for single parity, and I’d love to have dual parity as well. I’m trying to figure out how SSDs I would need to achieve a minimum of 8TB of storage with dual parity and fast speeds. Thank you!!
Great post and information. Got my 5x 4TB setup to saturate 1Gbps Ethernet. Copied ~5TB of data from my backup machine with consistent 120MB/s writes.
Then, (a few week later), the system SSD disk crashed, and had to reinstall Windows on a new system disk. All five disks beloning to the virtual drive(SS) were automatically found and attached. But now I get full write speed for 5 GB, and then speed drops to a few MB/s or stops completely.
Is there a way to check that settings for my virtual disk is still the same? Have no idea what is going on.
This guide saved me a ton of headache (and possibly money), thank you very much!
I did the 3 disk variant, just as you described, and the 30-40MB/s-ish speeds got up to 250-450MB/s, which is incredible. It dips to 30-50 when copying a lot of images for example, but I think it’s just natural. Small files, HDD doesn’t get along well.
I’m planning on upgrading to 5 disk in the future, so I’ll try out that version too!
Thank you again!
Hi,
I seem to be missing an important point here:
When writing a NTFS cluster of 64 kB, the correct interleave size will provide for perfect alignment and max performance. But most of the time, I’m not writing exactly 64 kB. Most writes are over that.
Will NTFS always issue writes to the storage system in cluster size, one AUS at a time? Will it not request to write a blob greater than that, leaving it to the storage subsystem to divvy it up?
Regards
hi, this guide was very helpful in increasing writing speeds. I have 5x3tb WD30EFRX in parity 1. I have set Interleave 32 and AUS 128. With Interleave 16 and AUS 64 the performance is lower in my case.
This has been a great education. Thank You!
That being said, I have 8 mixed drives ranging from 500gb to 4TB. All drives separately achieve write speeds of 150 to 200 MB/s. I have my pool set to 5 columns, single parity, and have tried every interleave and AUS under the sun. Any help would be appreciated.
@Anonymous, mixed drives may not be the best choice. For optimal performance, you definitely want 8 identical drives. In addition, once you’ve done that, I believe you want 7 columns for 8 drives. Unfortunately, if the drives must be mixed, YMMV on performance, and finding the optimal configuration becomes much more complex.
Correction, I believe 8 columns (or more) for 8 drives is optimal. From this article, it looks like 5 columns can work, but I don’t believe it will provide maximum throughput.
Ok, final correction: I still believe you’re asking for trouble mixing disks like that, but regarding the columns point, I clearly fell through for you. 8 columns will not allow you to choose a proper AUS, so 5 was a fine choice. Sorry for the confusion
my system is a little simpler, just a mirror in storage spaces with two 4 TB drives for my data. I found that there was the burst and then a slowdown. i tried formatting the drive with all the option for AUS and then tested copying a 16 gb file. For all the AUS sizes I found the same result of the initial burst and a slowdown to 150 MB/s for all.
Oddly sometimes the slowdown would be down to 20 MB/s but then trying again with same AUS after format the slowdown would be back to 150 MB/s.
Warning for using SS, recovery is a nightmare.
And using ReFS with parity does not work as expected, resilliency is broken.
https://codevalue.com/storage-spaces-recovery-war-story/
https://www.reddit.com/r/DataHoarder/comments/scdclm/testing_refs_data_integrity_streams_corrupt_data/
This is a very interesting article.
I got great performance improvements on my Pool with 5 Columns (Disks) of 8TB HDD’s WD-RED with one Parity. Will give a capacity of 29TB.
I used:
NTFS_AUS = 64K / 4 Columns => Interleave = 16KB. Works ok, I think …
I used the same settings for a Pool with 5 Columns(SSD’s) of 2TB 2,5″SSD. Will give a capacity of 7,2TB.
With the same settings performance is worse compared to the HDD-Pool performance.
I understood, that there is the difference in the NTFS_AUS between spaces >16TB.
Why the performance of my SSD-Pool is so poor. It should be better than the HDD-Pool.
I would be very interested in a good tip 🙂
Best regards from Germany
First off, thanks for this article. It was extremely helpful.
Looking for some guidance on my plan with optimizing my potential setup. Let me know if my logic is off.
Potential Setup:
8x18tb Seagate drives
Double Parity
6 columns
64kb AUS
16kb interleave
99% of the data is large scale video files of raw footage and long term storage. I assume doubling the AUS and interleave could increase write performance with minimizing waste storage space based on file types.
Thank you so much for this article! I previously had 6 x 4tb drives in a mirror configuration and I was running out of space so I purchased 2 8tb drives. After installing the drives I decided instead of expanding my pool I was going to completely rebuild it with parity instead of mirror for even more space. Backed everything up to external drives, made the changes and started copying my data back. It seemed to be going good so I went to bed. When I woke up I found that the transfer from backup externals to the SS wasn’t even 25% finished because transfer speeds had dropped to only 45mb/s.
Found your article and deleted the SS and started over. Transfer speeds are great now and averaging ~190mb/s
Even with ReFS and integrity streams turned on the speed is great. But to use ReFS with integrity streams you also need the data deduplication commands to scrub and garbage collect etc, otherwise its actually worse than NTFS. And for that you need Windows server. So i guess this is still a good ZFS alternative on non server Windows. Or am I missing something?
*This is NOT a good ZFS alternative
Very nice article, one of the few that truly help to understand how Storage Spaces actually work, thanks.
But, there seem to be some misleading inconsistency in what you call “slab” (256KB by default) and what Microsoft calls “slab” in the official docs ( https://learn.microsoft.com/en-us/search/?terms=Slab -> https://learn.microsoft.com/en-us/windows-server/storage/storage-spaces/delimit-volume-allocation -> https://techcommunity.microsoft.com/t5/storage-at-microsoft/deep-dive-the-storage-pool-in-storage-spaces-direct/ba-p/425959 ). I was unable to find any “truly official definition” of the term “slab” by Microsoft, but it looks like what they call slab is the “SS Provisioning allocation unit size”, which is always 256MB. (Which makes more sense in the thin-provisioning scenario, but works about the same either way.)
AFAIU, for a 3-columns (single parity) on 6 physical HDDs scenario, SS first randomly picks 3 of 6 disks to write the data to (allocates 256 MB on each of 3), and then stripes the file data into (2x256KB chunks of data + 256KB parity) just like on your screenshots, using just those 3 pre-selected disks. If the file is growing larger (actually, it does not necessarily start from the beginning of the 256MB slab), a second 256MB slab would be allocated, and only at this point the data from that file would be physically located on more than 3 disks.
Some older discussion, just for the context:
https://social.technet.microsoft.com/Forums/en-US/7da895d8-cef0-4b07-b522-27e30a70e4ca/storage-spaces-slabs-and-columns?forum=winserverfiles
I have been looking for information but i only get pieces of it from various sources and cannot stitch it all together.
I have 4x12TB HDDs and 2x250GB SSD. I want to use Storage Space to create a single large virtual disk with 2 tiers: 1 for data at rest and 1 for caching.
I am looking to:
create a parity tier for my HDD and a two-way mirror tier for my SSD.
create a virtual disk using both tiers with 3 columns (could i use 5 for better performance, if so how?) and a 16KB interleave. Couldn’t find the proper PowerShell command/arguments to pass to achieve this.
To answer myself I think SDelete -z might clear deleted data on ReFS to bring it back to pool.
Thanks for sharing your story. I’m planning the use storage spaces SSD pool for several VMs. I’m currently playing with 3 enterprise drives while waiting for the other 2.
For 3 columns and interleave=32, NTFS 64k provides good write performance. I guess for 5 columns I have to use interleave=16 in order to have full alignment with same NTFS AUS of 64k.
What about -WriteCacheSize parameter? There’s no difference in write performance with and w/o cache, but if WBC is enabled, what will happen if power outage occurs during write operations? Do you have any experience with playing with this parameter?
I’m wanting to rebuild my 12 drive storage space to improve write performance but I’m still confused about the number of columns. I would like to have the ability to have 2 drives fail without losing data. I think that means the “-1” part of the equation needs to be “-2” for me. Also, I’m wondering how the performance will be affected when I add drives. I’m currently copying all of the data from my 12 drive storage space over to 3 12TB hard drives. Once I’ve rebuilt the storage space and copied my data back to the storage space, I would like to add these 3 drives to the Storage Space. Will my Storage Space performance go back to being bad after I add these 3 drives? I think that I would want my AUS to be 128, # columns to be 10, parity drives 2, and interleave to be 16 when I set it up. This makes your equation work out perfectly initially. Does adding 3 drives to the pull increase the number of columns?
*pool
One other thing I forgot to mention. I would like to use REFS as it seems that it should be better for large data pools. Is there any downside to me using REFS instead of NTFS?
Well, this is annoying. I want to setup a 3 disk storage where usage will be a combination of lots of small files (2-3mb) and lots of large files (500Mb – 4GB). It seems I can’t have it both ways. The choice is lots of wasted space or very slow speed.
“There is no NTFS AUS that would be divisible by 3 and settable as interleave size for the virtual disk.”
Is there any supported file system for which this isn’t true? ReFS?
I have an HP Gen10 Microserver (cube form factor) that has 4 SATA bays:
https://www.hpe.com/psnow/doc/a00008701enw
It makes a very nice backup repository except for the problem listed above.
I have confirmed the abysmal write speed when setting up a 4 column parity space, so for now I’ve gone back to a 3 column setup and 66.6% efficiency.
I’d love to get that 13.3% back.
You are my hero! I was getting 40-50MB/sec writes to a 4 drive Parity array before I ran across this article. I rebuilt it as recommended and now get around 400MB/sec writes.
Thank you!
Absoutely great write up. So glad I found this.
I was deciding whether I should use something like Softraid XT or go ahead and use Windows 11 Storage Spaces. I’ve heard of so many problems with performance on Storage Spaces, that I was leaning to Softraid.
Would love to hear your thoughts on that, but aside, I’m wondering what the ideal AUS, Interleave and Columns would be for my setup and would appreciate your input.
I have four Samsung 8TB SSD drives and want to setup a RAID5 array to house media conent (video and photo, there are some smaller metadata and image files that range 500-1000kb range as well). The vast majority of the content is in multi gb size files.
Based on your anaylsis, I think I should be using the following;
Interleave: 64kb
AUS: 128kb
Columns: 3
What do you think?
Perfect and thank you for this livesaver!
Awesome write up on the subject. KUDOS!
I’ve got 4 disks and planning to have two thin provisioned vdisks, one mirror and one simple.
@Doug. I’m is experimenting with the very same disks but in Server 2022. Have you come to any conclusion what’s most optimal?
I’ve tried multiple scenarios now and I would say that I get rather confused.
Doing ReFS and AUS to choose from is 4K or 64K so I’ve taken this into account and adapted to Interleave 32K for a mirrored (2 col) and 16K (4 col) simple volume.
The results: screenshot of a bunch of Atto disk benchmark.
https://i.imgur.com/WwRJDI0.png
Any logic to the results, I have a hard time finding it?
Think I’m going with the Interleave I’ve set but 4K AUS looks like it get a little ahead in performance.
Found description error in the image. Of course is it 4 col on all simple test…
Thank you for the clear explanation and instructions. I was able to reconfigure the storage pool on my system. I had to do so anyway since I added 2 new drives (now have 5x 8TB Seagate drives) and needed to reformat to increase the AUS to support more than 16TB SS. Performance improvements are noticeable but spotty. To test, I am copying a file from my main drive which is a Samsung 980Pro EVO PCIe 4.0 SSD and I’m getting speeds from 30-700MB/s according to taskman. I’m not sure how accurate this is, so I want to try something more reliable (I guess perfmon). What’s interesting is checking a suspect failing drive with a file copy (drive has a caution in CrystalDiskInfo): interestingly, removing the storage pool and creating a partition directly on the disk and trying the same copy shows slightly erratic performance. Logical conclusion was to try both of the new disks and then try all 3 of the older drives (several years older) with the file copy direct to disk. All drives performed roughly the same, approximately 200MB/s with occasional dropouts to 160MB/s or so. I don’t understand this, but it gives me reason to suspect that the issue is with my system and not the drives.
What’s really interesting is this: turning off write caching on all of the storage pool drives resulted in copy speeds of 5-6MB/s (!). Unless write caching is somehow used despite aligned striping, it would seem there is something going on here that is unexpected. Can someone confirm disabling write caching in device manager does NOT impact performance on their aligned parity SS so I can rule out other issues here? In the meantime, I will keep experimenting.
I bookmarked this post a long time ago and just decided to try it out. I need more disks to transfer my data to another virtual disk as it’s got too big, but saw write speeds of 500MB/s (across 9 disks connected through SAS) so that makes me happy! Not so sure on the read speeds as it was maxing out writing to the local SSD at 200MB/s and I also couldn’t get it to go more than 200MB/s over my network (I have a twin 10GbE card in both machines but I’ve never managed to get it to go beyond 2GbE for some reason). So if you fancy fixing that for me too… 😆
Note that I’m using dual parity so the calculation for AUS becomes (columns – 2) * interleave. And as the man says – don’t forget to actually set the AUS too because Windows will do whatever it wants if you don’t force it (it took me a few attempts to realise this!)
Final command I used which takes care of everything:
New-VirtualDisk -StoragePoolFriendlyName “Storage pool” -ProvisioningType Thin -Interleave 32KB -FriendlyName “Fast Parity” -Size 63TB -ResiliencySettingName Parity -NumberOfColumns 6 -PhysicalDiskRedundancy 2 -WriteCacheSize 32MB | Initialize-Disk -PassThru | New-Partition -DriveLetter G -UseMaximumSize | Format-Volume -AllocationUnitSize 128KB
Also, this seems to speed it up more for me too.
Set-StoragePool -FriendlyName “Storage pool” -IsPowerProtected $false
Thanks so much for this article!
Hello,
I’m having a problem with my current setup (4x2TB). The write speed while copying a file to the disk is start around 390MB/s then dropes till 65MB.
I’ve noticed that when I start copying the system will cache the data to the System Memory then a certin Point the speed will relay on the speed of the disks.
When copying a 1GB File for exp. this Behavior can’t be noticed, but copying a 20GB or so File then I can see it in Taskmanager.
I created with those 4 Drive a Parity Raid with 3 Columns 3:
New-VirtualDisk -StoragePoolFriendlyName “Storage pool” -FriendlyName “WasteServerExample” -NumberOfColumns 3 -Interleave 32KB -ResiliencySettingName Parity -UseMaximumSize
Formated the Drive NTFS with AUS 64KB
Read Speed is ok but Write Speed is realy bad.
PS: I tried different Raids and got the same results (Strange)
Also I’m using the config in a VMware ESXi Server. So each Drive is configured as a Data Store and then I attached them to the VM (windows Server 2019)
Any Idea how to fix this?
So does this apply to non-parity multiple disk setups, like 4 disk mirror for a RAID-10-like setup (2 columns, 4 disks)?
This would be for setups needing to focus on performance, so 50% loss in drive space availability would be okay.
So, what would be the implications of going with ReFS? ReFS only has two AUS choices, 4kb and 64kb.
In a parity tier with 5 columns (12 disks), this would mean the perfect alignment would be with 16Kb interleave size. Sounds awful.
Thoughts?
What an incredible, in-depth write-up. Thanks for taking the time to do this and sharing it with the world. Curious if there are any performance or reliability gains to be had with Powershell if using Storage Spaces for a simple mirror (RAID 1.)
Would you consider raid 10 over parity in SS?
I have 4 x 1.6TB Intel 3510 I want to use in my gaming system. I want was considering just putting them in RAID 0 to run my games, random programs, but I have a 1TB M.2 I can use for games and would like to store some photos and movies on there. So I think parity or Raid 10 would be a better option.
I understand to get best speeds I would have to make the columns 3, and I would in theory get 4.2TB of storage which is plenty for me.
If I wanted RAID 10, how do I go about it? I would assume I will set up SS in mirror and then use Powershell to reconfigure the layout?
So, degraded copying has been an irritant for a LONG time! I struggled with the write-up, but finally figured it all out and am now seeing copy speeds which make me smile. I’ve even copied from my SS to a fast SSD and saw numbers over 400 MB/s!
Thanks for your help.
A new problem: my workstation uses an all-flash storage pool, 5 x 6.4T U2 hard drives, divided into 5 columns, interval set to 32K, AUS set to 128K, and the effect is very good. However, no matter how you create a virtualdisk, 1GB of write cache will be created. Because it is all-flash, this 1GB write cache is also built within the SSD, which not only does not increase the write speed, but also amplifies the amount of writes. Have you ever encountered this situation? How can I set the write cache to 0?
Still confused about something. If I have 8 x 6TB disks. Would 5 columns be the best I can do, since 6, 7, or 8 columns wouldn’t work in terms of interleave and AUS?
I played around with 5 x 3TB drives I had laying around. Created a Storage Pool with 3 drives and 3 columns, 32KB interleave and 64KB AUS. Copying 20-40GB files from another drive gave me around 230MB/s. Creating a Storage Pool with 5 drives and 5 columns, 32KB interleave and 128KB AUS gave me around 430MB/s with the same files. The only negative is that if I am copying more than 1 file at a time to the virtual disk or reading and writing from/to it at the same time, performance tanks. In the latter, reads are fine but writes drop to 10MB/s while the read is happening. I guess that’s just the nature of the beast with HDDs. Now I need to look into adding an SSD and do tiering which should hopefully help with that.
Sorry it this is a silly question. Will this approach work with Windows 11 Pro (AMD Ryzen Threaddipper 3960X 24-Core Processor, 3801 MHz, 24 core, 48 thread, ASUS board)?
I would like to set up a single parity data store with 5x 18Tb Seagate Exos X18 ST18000NM000J (CMR) drives
Setting up in Storage Settings generates a single parity storage pool of 81.1TB. Following your posts I was going to run
New-VirtualDisk -StoragePoolFriendlyName “Storage pool” -ProvisioningType Fixed -PhysicalDiskRedundancy 1 -Interleave 16KB -FriendlyName “Data” -ResiliencySettingName Parity -NumberOfColumns 5 -UseMaximumSize
Is this correct for a range of file sizes from 516KB – 3MB (most 516KB)?
Thanks
Thank you very much for this article, it helps a lot.
So i was wondering if using storage bus cache in combination with parity mirroring, does we have to consider setting „CachePageSizeKBytes“ to an specified value or is this irrelevant?
Hi,
I am trying to setup a RAID 10.
I have 4 disks of 16TB each.
Want to put ReFS on it.
Will add a cache drive later using PrimoCache.
ReFS offers 4k and 64k allocation unit size.
I assume that I have to set it to 2 columns with a 2-way mirror. This way I should get RAID 10, correct?
(BTW: what will tell me, that the RAID is degraded???)
Now, applying your formula for 4k AUS, and given this is without parity, I would set the interleave to 4k also, correct? (Or 64 AUS and 64 interleave)
I’m at a crossroads with my Windows Storage Space Parity volume. I have been using this solution for mostly a media vault for years (2016) with little issues aside from slow writes. A few years ago I upgraded to Server 2019 and new hardware where I read more on how to properly set up a parity storage space in PowerShell. This seemed to resolve my write issue for a while but for some reason it is back.
Current Server Hardware Configuration
Intel NUC 11 NUC11PAHi5
1TB internal NVME SSD (Server 2019 OS -> 2025 soon)
64GB 3200Mhz RAM
OWC ThunderBay 8 DAS over Thunderbolt
4x – 6TB WD Red Plus
4x – Seagate Exos X16 14TB
To note I am in the middle of upgrading my 8 HDD’s from 6TB WD Red Plus to Seagate Exos X16 14TB. So far 4 have been replaced.
I have halted my HDD upgrade as I am re-evaluating my Parity Storage Spaces so if need be i can copy my 37TB of data over to the unused drives to potentially rebuild my array. I wanted to double check my SS configuration so I went back to storagespaceswarstories to verify my settings on the current volume storing the 37TB of data .
Years ago in powershell I configured 5 columns on the 8 HDD’s with a 16kb interleave, then formatted the volume with ReFS at a 64K AUS. There is an oddity when I checked these settings.
PS C:\Users\administrator.COMPSMITH> Get-VirtualDisk -friendlyname “Parity_Int16KB_5Col_THIN” | fl
ObjectId : {1}\\SERVER\root/Microsoft/Windows/Storage/Providers_v2\SPACES_VirtualDisk.ObjectId=”{187446ee-3c29-11e8-8364-806e6f6e6963}:VD
:{43d963e7-19a0-49d4-acf4-40be8cc8fe7d}{1558397e-f97f-4b6c-ae35-d43546e731ee}”
PassThroughClass :
PassThroughIds :
PassThroughNamespace :
PassThroughServer :
UniqueId : 7E3958157FF96C4BAE35D43546E731EE
Access : Read/Write
AllocatedSize : 44159779995648
AllocationUnitSize : 268435456
ColumnIsolation : PhysicalDisk
DetachedReason : None
FaultDomainAwareness : PhysicalDisk
FootprintOnPool : 55201872478208
FriendlyName : Parity_Int16KB_5Col_THIN
HealthStatus : Healthy
Interleave : 16384
IsDeduplicationEnabled : False
IsEnclosureAware : False
IsManualAttach : False
IsSnapshot : False
IsTiered : False
LogicalSectorSize : 512
MediaType : Unspecified
Name :
NameFormat :
NumberOfAvailableCopies :
NumberOfColumns : 5
NumberOfDataCopies : 1
NumberOfGroups : 1
OperationalStatus : OK
OtherOperationalStatusDescription :
OtherUsageDescription :
ParityLayout : Rotated Parity
PhysicalDiskRedundancy : 1
PhysicalSectorSize : 4096
ProvisioningType : Thin
ReadCacheSize : 0
RequestNoSinglePointOfFailure : False
ResiliencySettingName : Parity
Size : 63771674411008
UniqueIdFormat : Vendor Specific
UniqueIdFormatDescription :
Usage : Data
WriteCacheSize : 33554432
PSComputerName :
This shows an AllocationUnitSize of 268435456. But diskpart shows 64K:
DISKPART> filesystems
Current File System
Type : ReFS
Allocation Unit Size : 64K
I am unsure why these 2 values are different, so if someone can explain this and if this volume layout is good it would be appreciated. My hope is if I stick with SS and finish the HDD and OS upgrade performance will be back to normal.
I’m trying to determine why this write slow down is occurring. Could it be that the AUS is not lining up? Could it be the 2 different drive types? There are no SMART errors on any of them. Could it be an issue with server 2019 SS and I should upgrade? I also saw a comment posted here that a freshly formatted ReFS volume will write at full speed but as soon as one file is deleted, write performance tanks, so I have no clue what is going on.
Preferably I would like to not copy everything off and destroy the volume and continue upgrading the HDD’s, but if I have to I have been looking at alternatives.
Hey compsmith,
Keep in mind that the `Get-VirtualDisk command is quite literal. It’s querying the virtual disk, not the volume running on top of it.
In this case, the _AllocationUnitSize_ reported by that command appears to be the underlying slab size, which for Storage Spaces is normally 256MB. This is entirely unrelated to the AUS of the file system. So the discrepancy you’re seeing is to be expected.
Unfortunately, I don’t have an answer as to why you’re seeing the return of slow write speeds. ReFS is a bit of a goofball filesystem, especially if you have integrity streams turned on.
Similar to last comment, i also noticed a performance difference when manually doing in 2022., i tried doing on new 2022 server, a 16k interleave with 32k Aus on ntfs, 3 column , with ssds, and the sequential speed was bad sub 150mb with crystal mark. Then i used the gui , and got faster speeds. If any one reads this in 2025 is anyone else seeing this.